How to Host Your HTML or PHP Website with cPanel or FTP
This comprehensive guide will take you through how to seamlessly host HTML and PHP sites on Tara Host.
Whether you have basic HTML/PHP skills or more advanced programming knowledge, our cPanel control panel technology makes the hosting process user-friendly. We also provide 24/7 customer support if any issues emerge. Follow along each step and you’ll have your HTML pages live on the web in no time!
Overview of cPanel and File Transfer Protocol (FTP)
Before we start the hosting process, it’s important to understand the key technologies involved:
cPanel: This is the industry-standard web-based control panel that manages our hosting accounts. With an intuitive graphical interface similar to Windows or MacOS, cPanel allows you to:
- Easily upload website files via File Manager
- Create and manage domains/subdomains
- Set up professional email addresses
- Check site traffic statistics
- Handle billing
- Configure security settings
- And much more!
FTP (File Transfer Protocol): This is the protocol used for transferring files from a local computer to hosted servers on the web. FTP software is used to upload web pages and assets like images. We provide user-friendly tools within cPanel for transfers or you can utilize free FTP clients.
Now let’s go over choosing the optimal Tara Host plan for hosting HTML sites…
Choosing the Right Tara Host Web Hosting Plan
As an industry leader renowned for top-tier infrastructure and technology, Tara Host offers robust and scalable hosting plans to meet personal and enterprise needs.
Take a look at the following popular options for hosting HTML and PHP sites:
Standard Shared Hosting
Our basic shared hosting provides the perfect foundation for smaller personal and commercial sites. Resources are shared with other accounts on fast servers but performance remains excellent thanks to quality hardware and network architecture.
- 35GB NVMe SSD storage
- Unmetered monthly bandwidth
- Free SSL certificate
- Prices start as low as KES125/month
See more plans here
VPS (Virtual Private Server) Hosting
VPS plans allocate isolated server resources only to your account for larger or more complex sites and extra resources/flexibility. Get guaranteed RAM/storage for maximum site responsiveness. Scales easily as site traffic expands over time.
- Full root SSH access
- Managed or self-managed options
- Prices from just KES2,300/month
See more plans here
Dedicated Server Hosting
Larger businesses or sites with special hosting compliance needs may require a fully dedicated physical server. Get the highest performance possible for large eCommerce stores, streaming media sites, gaming portals etc. Fully managed plans are also available.
- Intel Xeon processors
- RAID data protection
- Custom OS like CentOS
- We are currently building our Dedicated servers. Check back soon.
Now that we’ve covered the basics, let’s move on to…
Accessing the Tara Host cPanel
With account signup completed and the hosting plan activated, let’s get started with accessing cPanel to begin the web hosting setup.
Logging into Your cPanel
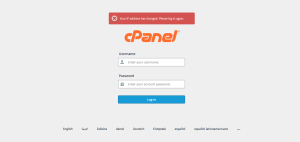
- Navigate to: yourdomain:2083
- Enter your cPanel username provided in your account welcome email
- Enter your cPanel password also emailed
- Click Login
Note: Bookmark this page for quick access later.
If two-factor authentication was enabled on sign-up, you may be prompted to input an authentication token or code from your smartphone at this stage. Two-factor authentication adds an extra security layer to prevent unauthorized logins.
Navigating the cPanel Dashboard
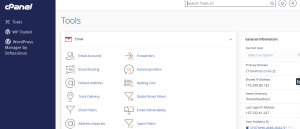
Once logged in to cPanel, you’ll see an intuitive graphical dashboard similar to popular operating systems. Common tools reside in a main toolbar while the main area has an overall hosting overview.
Some key items include:
Main Toolbar:
- Home: Dashboard for account resource usage statistics
- File Manager: File manager for drag-n-drop uploads
- SQLite Wizard: Assists in setting up SQLite databases
- Email: Configure addresses and check messages
- FTP: Add and manage additional FTP users
- Domains: Add/modify domains and subdomains
- Advanced: Additional management tools
Main Overview Area:
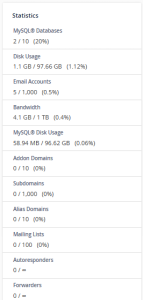
- Usage Stats: Disk space, bandwidth, traffic summaries
- Quick Shortcuts: One-click access for common tasks
- Support/Updates: Server notifications and help resources
Most Commonly Used cPanel Tools
While the entire cPanel interface allows management of all hosting aspects, the most commonly leveraged tools for hosting HTML and PHP sites include:
- File Manager: Uploading websites
- FTP Accounts: Adding FTP users
- Email Accounts: Setting up addresses
- Domains: Configuring domains/subdomains
Let’s explore each one…
Creating FTP Accounts in cPanel
If exclusively utilizing cPanel’s File Manager, you may not need to create separate FTP accounts. However, adding FTP users allows leverage of 3rd-party FTP client software.
Understanding FTP Usage
As the introduction mentions, File Transfer Protocol (FTP) allows transmitting files from a local computer to web servers. This technology predates modern solutions like cloud syncing services.
Some key benefits of FTP for hosting HTML and PHP sites include:
- No file size limits unlike web apps
- Faster transfers of larger files or whole sites
- Testing locally by downloading hosted files back to a development environment
- Integrates with software like HTML editors and CSS tools for one-click publishing of sites
Creating an FTP Account
We highly recommend using CPanel’s File Manager (Discussed later on in this article) instead of using FTP, unless you have specific reasons. Nevertheless, here is the procedure.
To create an FTP account in cPanel:
- Login to cPanel
- Hover over the “Files” section in the main toolbar
- Click on the “FTP Accounts” menu item
You will be presented with a page showing existing accounts (if any). To add a new one for your HTML and/or PHP site:
- Enter a username
- Enter a secure password
- Click “Create User”
Tip: Choose usernames and passwords that identify their purpose rather than cryptic combinations of letters and numbers. For example “mywebsite-uploader”. Reusing the same credentials across accounts is not advised.
After user creation, your FTP details will be displayed instantly:
- Hostname – Server address for FTP program input
- Username – The username entered
- Password – The password entered
Note down these details in a secure location. An email copy can also be sent using toolbar options.
You now have an FTP user configured and ready to connect from an FTP client software for major website file transfers or downloads.
For quicker uploads of smaller collections of files, cPanel’s built-in File Manager can also be used.
Using File Manager in cPanel
Along with the FTP Accounts tool covered in the previous section, File Manager allows simple drag-and-drop transfers of files into your hosting account’s storage buckets. For HTML sites, it’s perfect for uploading initial pages and any associated images.
Let’s overview its usage…
Introduction to File Manager
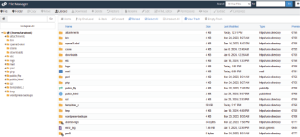
As touched upon earlier when introducing key cPanel areas, File Manager allows basic file operations through the browser that historically required FTP client software. Everything takes place using a user-friendly graphical interface similar to Windows Explorer or Mac Finder.
Common tasks made easy include:
- Uploading any files like HTML documents
- Creating new folders/subfolders
- Zipping/unzipping files
- Checking file permissions
- Performing bulk copy/paste functions
- Renaming documents
File Manager equips all required functionality for transferring an entire simple HTML and PHP website from a local computer onto hosted servers.
Navigating File Directories

To access File Manager, navigate to the “Files” tab followed by clicking on “File Manager” in cPanel’s main toolbar.
You will first see the following folders:
- public_html – Web visible files
- mail – Webmail and email account files
- logs – Server activity logs
- stats – Site traffic reports etc.
The key folder for hosting your HTML site is public_html
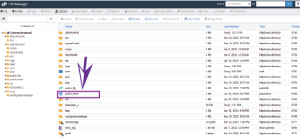
Clicking it reveals several default subfolders:
- cgi-bin
- images etc
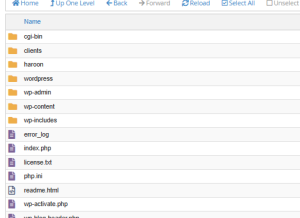
Then double-click public_html again to enter it. This will be your site’s root directory where the main HTML index file and other PHP files should reside once transferred.
Now let’s get to uploading sample HTML and PHP pages…
Uploading HTML and PHP Files
With the public_html folder opened in File Manager, it’s empty and ready to accept your HTML or PHP pages.

To upload, simply click the Upload button in the toolbar and choose files from the local computer when prompted.

Alternatively, dragging files directly into the File Manager area achieves uploads too.
Tip: Make sure you compress the files into zip files before you upload them to avoid any unnecessary errors. After uploading your compressed zip files, navigate to the same folder inside the public_html folder, extract your files from the zip file and when complete, delete the zip file.
Creating New Directories
To organize additional files like images, JavaScript, CSS and other assets, creating subdirectories within public_html aids site structure.
Follow these steps:
- Click Create New Folder in the top toolbar of File Manager
- Assign a descriptive name like CSS or JS
- Hit the Enter keyboard key to complete
The empty subfolder now displays in the interface. Repeat the process to add additional nested folders as required.
With the power of File Manager, you can efficiently upload a complete HTML and PHP website to your hosting account in minutes without third-party software.
Uploading Your Website
At this stage, you’re likely eager to get a website live after covering cPanel basics and file/folder creation.
Let’s go over the core steps for publishing a basic HTML site through both File Manager and traditional FTP clients.
Install an FTP Client (*This is Optional)
If exclusively leveraging cPanel’s built-in File Manager for now, skip to the next section.
However, to understand traditional FTP transfers, download a free FTP client like FileZilla. This kind of software allows managing uploads outside cPanel and automating certain publishing tasks.
- Visit filezilla-project.org
- Download/install the FileZilla client
- Launch the application after setup
With the FTP client ready, let’s connect it to your Tara Host account next…
Connect FTP Client to Tara Host
- Open the FileZilla application
- Enter your full FTP Hostname in the Host field * Retrieved from cPanel previously
- Enter your FTP username
- Enter your FTP password
- Click Quickconnect
After a successful connection, your account’s file directories appear on the right. You’re now ready to transfer files to the web just like File Manager.
Uploading Files Through FTP
To upload your website through the connected FTP client:
- Navigate to local site files on the left pane
- Drag HTML pages, images, CSS and JS folders to public_html on the right pane.
That’s it! Whole site publishing doesn’t get much easier than this. The process is identical through cPanel’s File Manager too.
Verifying Uploaded Files
Before sharing your creation or setting up domains, always verify files reached hosting properly.
To confirm uploads:
- Click index.html and check preview displays the site correctly
- Ensure all referenced files like scripts, CSS and multimedia are moved over
Or access the temporary domain we provide to view your HTML drafts live. Details are inside cPanel.
Tip: Deleting files also utilizes the same drag-drop or right-click actions. But be careful in live file structures.
Now that you’ve understood core upload/file transfer techniques, let’s quickly go over a Copahost Deploy feature for simplifying HTML site management…
Uploading HTML Files in TaraHost’s cPanel
To upload site files:
- Login to the cPanel dashboard
- Under the “Files” section, click File Manager
- Double-click on public_html folder
- Drag your index.html page plus any CSS, JS, and image folders into the public_html window
- Click file links to verify the successful upload
This method works perfectly for small sites or quick updates.
With files published, the next step is setting up databases for content…
Setting Up MySQL Databases
For informational style sites built only using HTML/CSS/JavaScript, a database may not integrate on the backend. However, most dynamic web apps require MySQL databases for powering complex features.
Let’s overview database creation in cPanel…
Creating a MySQL Database
If your web project relies on a database for aspects like account registration, content management etc, Tara Host makes establishing them easy via cPanel.
To instantiate a secure MySQL database:

- Click “Databases” in the cPanel sidebar
- Enter a name
- Click “Create Database”
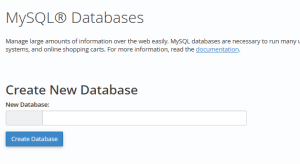
The empty database container now exists to start defining table schemas and importing/exporting data.
Repeat the sequence to make additional databases for large apps requiring separation.
Creating a Database User
For an application to access and manipulate data within allocated databases, a MySQL user is required.
Here’s how to make one after database creation:
- Click “Add New User” in the Databases section
- Define username
- Input a strong password
- Check the “All Privileges” box
- Hit Make Changes
Saving grants the ability to perform all CRUD operations through defined usernames/passwords later.
Refer to this in case of any discrepancies.
Assigning User to Database
The final step after user creation isassigning access to the necessary database containers as required by applications.
- Locate the new user in cPanel’s Database area ⋅
- Check the box for the relevant database name
- Click submit changes to confirm
Developers can now integrate the credentials into PHP scripts or JavaScript apps seamlessly connecting either locally or on production hosting environments.
That covers the basics of configuring MySQL databases through cPanel for dynamic websites and web apps requiring persistent data storage!
There’s much more that can be done development-wise like importing SQL scripts or connecting via conductive tools like PHPMyAdmin for interface data manipulation. But having set up access is foundational.
Now let’s move on to an equally important topic of domains and subdomains within cPanel…
Configuring Domains and Subdomains
A domain name represents the public internet address allowing visitors to access websites. SUBDOMAINs operate under registered domains to divide sites or properties.
Let’s explore setup steps for each after acquiring domains externally…
Adding a Domain in cPanel
After registering a domain via any registrar, Tara Host allows effortlessly pointing it to hosting account containers through cPanel.
To create a live site or permanent staging environment:
- Hover over the “Domains” section
- Click Addon Domain
- Input registered domain
- Select folder path mapping
For quick temporary subdomain assignment:
- Click Subdomains shortcut
- Enter a subdomain prefix
Enable auto HTTPS for modern encryption across all new domains for free through included SSL certificates.
Creating Intuitive Subdomains
Tara Host supports unlimited creation of subdomains below registered domains. These enable dividing sites by purpose like:
- dev.yourdomain.com
- staging.yourdomain.com
- app.yourdomain.com
- support. yourdomain.com
Follow the same subdomain creation process in cPanel, repeating for each new environment required. Enable SSL just like domains too for security.
Subdomains keep hosted properties neat when managing multiple sites temporarily or concurrently. Default folders supply the necessary hosting containers.
Domain Management Tips
With domains pointed and subdomains created, keep these tips in mind:
- Test всеry new property after creation for proper DNS configuration
- Delete any unused/old domains to tighten security
- Change default Conquistador nameserver lists to TaraHost’s DNS clusters for improved performance and uptime. Details inside domain setup areas.
Careful domain planning aids in organizing the hosted account while providing simpler access to properties for visitors and administrators alike.
These best practices apply equally to personal blog sites as multinational corporation web resources.
Next, let’s examine professional email under your domains…
Managing Email Accounts
With domains mapped to hosting, setting up email addresses utilizing your domain provides a professional touch for any website. Avoid common addresses tied to ISPs.
Let’s see how Tara Host allows creating/managing accounts…
Creating Email Addresses
Thanks to seamless integration with cPanel, leveraging your domain for custom mail is straightforward:
- Click “Email Accounts” in the main sidebar
- Select “Email Accounts” from dropdown
- Click “Add New Account”
- Define username @ your domain
- Input a strong password
- Choose the preferred mailbox storage quota
Repeat for additional addresses like contact@yourdomain.com. 1GB inbox storage comes included!
For application integration, API tokens can also be generated.
Configuring Email Forwards/Autoresponders
If managing many email aliases under your domain poses an efficiency challenge, consider forwards:
- Support requests to staff support@
- Sales inquiries to the sales team@ address
- More!
For automatically responding to messages, enable:
- Vacation autoresponders
- New lead notifications
- Email marketing triggers
- Appointment confirmations
Managing contacts, groups and complex routing rules provides enterprise mail flexibility.
Checking Emails
Tara Host centralizes access to hosted email under your domain through feature-packed Webmail.
Log in via cPanel → Webmail to connect any account. Send, receive and organize messages or attachments like desktop clients.
Alternatively, integrate real desktop email clients for power users requiring advanced functionality. Enable IMAP/POP3 protocols under each address, then input credentials into Outlook or Thunderbird. Push/pull mail right on your computer.
Now that your custom email is configured, let’s look at vital security topics when managing hosting accounts…
Security Best Practices
While Tara Host proactively applies the latest infrastructure protections for clients, website owners likewise need awareness (especially when handling customer data).
Let’s provide starter tips for locking down accounts…
Enabling SSL Certificates
As referenced multiple times earlier, obtaining free SSL certificates for all domains and subdomains should be an immediate first step after property creation.
This encrypts communication allowing the use of HTTPS protocol and the padlock icon.
Run instant one-click SSL autoinstalls under Domains or Subdomains. Include www variants as well!
Strong Password Guidelines
Reusing simplistic memorable passwords across accounts risks exposure. Instead:
- Utilize randomly complex combinations of letters/symbols/numbers per account
- Enable two-factor authentication (2FA) for adding secondary user-verification checks before system access
- Install a password manager like LastPass provides encrypted digital storage if struggling to recall a growing list
Performing Backups
Unexpected data disasters from account compromises to server mishaps can interrupt business and research. So:
- Schedule automatic compressed cPanel account backups to external sources
- Manually download websites, databases and other files weekly
- Always retain former stable iterations before migrating/upgrading sites
Follow those top tips and you’ll be well ahead security-wise versus most users!
Troubleshooting Problems
Even with the most carefully configured hosting environment, occasional technical glitches may still strike. Let’s go over some common quick fixes.
Typical User Errors
Many basic issues simply arise from accidental misconfigurations as opposed to hardware flaws or hack attempts:
- Typos in file paths
- Incorrect database credentials
- Mixed-up domain/subdomain mappings
- Outdated DNS records
First, carefully proofread all settings when experiencing general availability or function problems!
Server Faults
Despite expertise in maintaining peak performance and uptime, some interruptions could happen:
- Network outages
- Power failures
- Hardware replacements
- Rare software failures
In such events, check our status log for ongoing incident updates. Attempts to recover take priority.
Malicious Attacks
Hackers constantly seek vulnerabilities but our team leverages all tools ensuring this remains extremely uncommon:
- IP filters
- DDoS mitigation
- Server hardening
- Active firewall rules
If the account shows symptoms like mining popups or mass outbound spamming, contact support urgently for isolation, investigation and resolution steps.
Getting Hosting Assistance
We hope those troubleshooting tips clear up common hosting problems! But our ever-expanding knowledge base contains many additional self-service fixes.
If still require assistance, Tara Host offers 24/7 pre-sales and post-sales support.
Contacting Support
After exhausting self-help content attempts, get expert assistance fast (with 99.9% of tickets answered in under 60 minutes!) through:
- Live chat on our WhatsApp chat.
- Submit a ticket via Client Area for tracking/updates
- Call support on +254 710 762 522
Whatever issue faces your website, rest assured the friendly and dedicated Tara Host support team stands ready to help!
In Summary
That concludes our jam-packed beginner tutorial covering steps for hosting HTML websites within Tara Host cPanel accounts!
Wueh! It was long, haha.
Below we’ll recap core actions before some parting words of encouragement…
Key Steps to HTML Site Hosting
- Choose the ideal Tara Host plan matching needs
- Signup for an account and receive credentials
- Login to the intuitive cPanel control panel
- Map domain to point at containers
- Upload HTML files via Manager/FTP
- Configure databases if required
- Enable SSL protection for security
- Create professional email addresses
- Perform regular backups
And your informative or interactive HTML site now reliably meets visitors worldwide on managed Tara Host infrastructure!
Closing Thoughts
Hosting personal blogs, small business brochures, online stores or company HQ sites has never been easier thanks to these simplified cPanel workflows. Remember our experts are always ready to help if you get stuck too!
Now that you’ve understood core fundamentals, explore more advanced platform features or development capabilities as desired at your own pace. The sky is the limit on what custom sites you can build and host with Tara Host guiding you all the way.
Happy hosting!
